This is my story of devising a fix that saved me a bunch of money, letting me keep existing gear and learning a lot about cabling along the way.
From my previous post you may have gathered that I’m running a homelab setup involving 25 Gigabit Ethernet.
As most of my setup was still 10 Gigabit/s when I started upgrading, I realized that upgrading network cards (and, eventually, switches), was not enough to actually attain a 2.5x speedup.
No! It turns out that I would also have to replace a whole bunch of DAC cables, as they still only deliver 10 Gbps when connected to 25 Gbps network adapters:
1
2
3
4
5
# run iperf3 server on machine 192.0.2.1
iperf3 -s

# run iperf3 client on machine 192.0.2.2 and connect back to 192.0.2.1
iperf3 -i 1 -c 192.0.2.1 --bidir
Connecting to host 192.0.2.1, port 5201
[  5] local 192.0.2.2 port 52336 connected to 192.0.2.1 port 5201
[  7] local 192.0.2.2 port 52338 connected to 192.0.2.1 port 5201
[ ID][Role] Interval           Transfer     Bitrate         Retr  Cwnd
[  5][TX-C]   0.00-1.00   sec  1.10 GBytes  9.42 Gbits/sec    0   2.35 MBytes
[  7][RX-C]   0.00-1.00   sec  1.09 GBytes  9.37 Gbits/sec
[  5][TX-C]   1.00-2.00   sec  1.09 GBytes  9.40 Gbits/sec    0   2.59 MBytes
[  7][RX-C]   1.00-2.00   sec  1.09 GBytes  9.40 Gbits/sec
[  5][TX-C]   2.00-3.00   sec  1.09 GBytes  9.40 Gbits/sec    0   2.73 MBytes
[  7][RX-C]   2.00-3.00   sec  1.09 GBytes  9.40 Gbits/sec
[  5][TX-C]   3.00-4.00   sec  1.09 GBytes  9.40 Gbits/sec    0   4.08 MBytes
[  7][RX-C]   3.00-4.00   sec  1.09 GBytes  9.40 Gbits/sec
[  5][TX-C]   4.00-5.00   sec  1.10 GBytes  9.41 Gbits/sec    0   4.08 MBytes
[  7][RX-C]   4.00-5.00   sec  1.09 GBytes  9.40 Gbits/sec
[  5][TX-C]   5.00-6.00   sec  1.09 GBytes  9.39 Gbits/sec    0   4.08 MBytes
[  7][RX-C]   5.00-6.00   sec  1.09 GBytes  9.41 Gbits/sec
[  5][TX-C]   6.00-7.00   sec  1.09 GBytes  9.40 Gbits/sec    0   4.08 MBytes
[  7][RX-C]   6.00-7.00   sec  1.10 GBytes  9.41 Gbits/sec
[  5][TX-C]   7.00-8.00   sec  1.09 GBytes  9.40 Gbits/sec    0   4.08 MBytes
[  7][RX-C]   7.00-8.00   sec  1.09 GBytes  9.40 Gbits/sec
[  5][TX-C]   8.00-9.00   sec  1.10 GBytes  9.41 Gbits/sec    0   4.08 MBytes
[  7][RX-C]   8.00-9.00   sec  1.09 GBytes  9.41 Gbits/sec
[  5][TX-C]   9.00-10.00  sec  1.09 GBytes  9.40 Gbits/sec    0   4.08 MBytes
[  7][RX-C]   9.00-10.00  sec  1.09 GBytes  9.39 Gbits/sec
- - - - - - - - - - - - - - - - - - - - - - - - -
[ ID][Role] Interval           Transfer     Bitrate         Retr
[  5][TX-C]   0.00-10.00  sec  10.9 GBytes  9.40 Gbits/sec    0            sender
[  5][TX-C]   0.00-10.00  sec  10.9 GBytes  9.40 Gbits/sec                  receiver
[  7][RX-C]   0.00-10.00  sec  10.9 GBytes  9.40 Gbits/sec  1158            sender
[  7][RX-C]   0.00-10.00  sec  10.9 GBytes  9.40 Gbits/sec                  receiver

iperf Done.
So what is really going on there with my DAC cables? With one cable costing between $15 and $20, replacing them gets costly quickly.
DAC stands for “Direct Attach Copper”, which is a fancy way of saying “not really much other than plain old wire” — as opposed to, say, AOC (“Active Optical Cable”) or ONU (“Optical Network Unit”). These three-letter acronyms are implementations of transceiver assemblies that, fittingly, fit into slots named after another three-letter acronym, SFP (“Small Form-factor Pluggable”).
Interestingly, SFP is indeed very much a lot more than just plain old wire. In a sense, it’s a revolutionary way of how to network — it separates the “what” from the “how”. To be fair: that revolution already happened over 20 years ago without much impact on the home user front, so no shame if you haven’t heard about it.
Just remember that the days of the old RJ45 style twisted-pair Ethernet cable (the ones with the plastic noses that keep breaking) are numbered: they are just not designed for speeds at or above 10 Gigabit/s. While higher-speed standards exist, the practical limit for such cables is 10 Gigabits per second, and even then the power consumption can be as 5-10x as high as with Direct Attach Copper, which uses twinaxial cabling (like coax cables but with two inner wires). The only remaining niche for RJ45-cabling might be PoE (Power-over-Ethernet). For longer runs (>30m) of data-only connections, SFP-terminated fibre usually trumps copper both in cost and ease of install, also speaking of my own experience.
Thanks to the SFP* family of connectors (SFP, SFP+, SFP28, SFP56, SFP-DD, SFP112, SFP-DD112) many choices of wiring standards are instantly compatible at the network adapter and switch level, because the actual transmission technology is moved from the network adapter/switch to the connector itself, the transceiver assembly (notably, also a wider/4x faster QSFP* connector family exists, which is not mechanically compatible with SFP but otherwise the same idea, and adapters between the two form factors exist).
Put simply, the network adapter/switch talks to a small PCB in the SFP* or QSFP* connector, and whatever is on that small board does the actual communication to another small PCB at the other end of the cable. These PCBs can be trivial (as with passive DACs) or be entire computers running Linux, as is with many ONUs.
That technological advancement however comes hand in hand with planned obsolescence: Ethernet cables (“Cat 5E”, “Cat 6”, etc.) with RJ45 modular connectors may just happen to work well enough to provide higher than initially projected speeds (e.g, upgrading from 1 to 2.5 Gbps, or 5 to 10 Gbps). SFP connectors on the other hand — even when they are physically compatible — explicitly declare a bunch of metadata, including vendor and product ID, serial number, etc. and the network adapter uses this information to determine compatibility, adjust speed, etc. An otherwise perfectly fine cable may just not work because of these parameters!
One legitimate reason to check vendor and product ID is to fix hardware issues in software. This is what for example Linux calls “SFP quirks” — workarounds for certain SFP devices.
Sadly though, some networking gear, especially the enterprise-y kind, may also just plain out refuse to work with SFP adapters of an unvetted third party (looking at you, Cisco, Juniper, et al.)
While there is always the rationale of “quality assurance”, one can regard this as a new opportunity to rack up pricing due to this vendor lock-in.
Of course, smart engineers figured out a way to circumvent these restrictions. And even smarter businesspeople figured out how to charge good money for such hardware solutions. Most programming devices cost in the range of 100 to over 1000 US dollars, such as SFPTotal, SFP Codingbox/OnePort Programmer, FS BOX, FLEXBOX, Ubiquiti SFP Wizard, and Revelprog SFP Adapter come to mind.
Particularly the most expensive solutions not only provide an improved ease-of-use but also additional functionality such as performance metrics. For accessing the metadata though, it essentially comes down to accessing/modifying an EEPROM via I2C over pins on the SFP connector.
That can also be done with open-source/open-hardware solutions for cheap, which is what for example SFP-Master does (utilizing a CH341a programmer) or directly over the I2C bus of a Raspberry PI with that project.
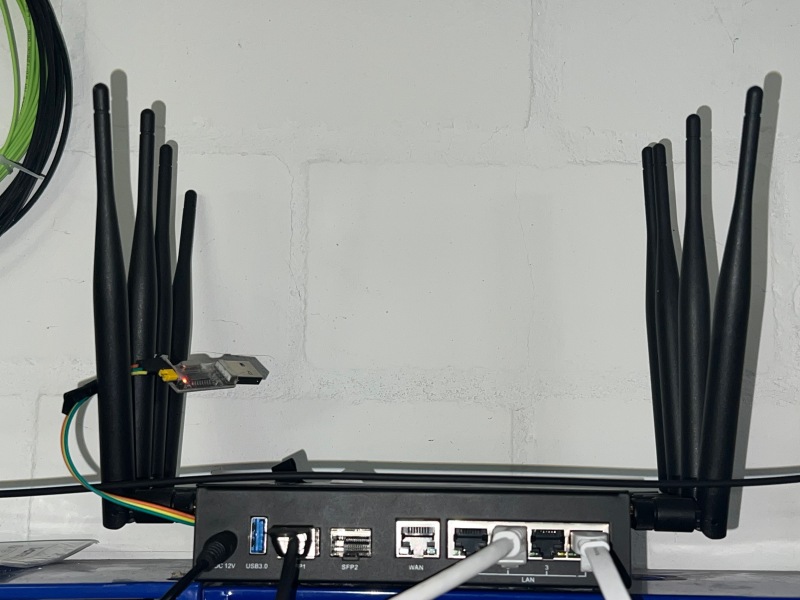
Even cheaper is utilizing existing general-purpose networking hardware directly (i.e., $0 if you have it). Not all devices allow that kind of low level access, though. I couldn’t find a way to do this with my NVIDIA Mellanox ConnectX/4 cards from Linux, for example. Luckily though, the sub-$200 Banana Pi BPI-R3 Linux/OpenWrt router (which I happen to have), comes with two SFP+ ports that you can talk to directly!
First, you’ll need some programs and kernel modules installed:
1
2
3
4
5
6
7
8
# Expose i2c bus over /dev/i2c...
modprobe i2c-dev

# Install i2c tools on OpenWrt 24 or newer, and on Alpine Linux
# OpenWrt 23 or earlier: replace "apk add" with "opkg install"
apk add i2c-tools i2csfp
# Also install ethtool for pretty-printing SFP metadata:
apk add ethtool-full || apk add ethtool
Now, we enumerate the i2c buses to find the ones corresponding to the SFP ports. Your system may have several unrelated buses; make sure to get the right one.
1
i2cdetect -l
On BPI-R3, the SFP buses are named i2c-gpio-0 and i2c-gpio-1, and in this case are accessible via /dev/i2c-1 and /dev/i2c-2 respectively:
i2c-0	i2c       	i2c-mt65xx                      	I2C adapter
i2c-1	i2c       	i2c-gpio-0                      	I2C adapter
i2c-2	i2c       	i2c-gpio-1                      	I2C adapter
We have connected our cable to SFP2, which is /dev/i2c-2. We will now enumerate enumerate I2C devices on that bus; we have to specify the name, not the device path:
1
i2cdetect i2c-gpio-1
If the SFP connector is detected, we should at least get chip address 0x50, but depending on the transceiver, additional addresses may be accessible:
WARNING! This program can confuse your I2C bus, cause data loss and worse!
I will probe file /dev/i2c-2.
I will probe address range 0x08-0x77.
Continue? [Y/n] y
     0  1  2  3  4  5  6  7  8  9  a  b  c  d  e  f
00:                         -- -- -- -- -- -- -- --
10: -- -- -- -- -- -- -- -- -- -- -- -- -- -- -- --
20: -- -- -- -- -- -- -- -- -- -- -- -- -- -- -- --
30: -- -- -- -- -- -- -- -- -- -- -- -- -- -- -- --
40: -- -- -- -- -- -- -- -- -- -- -- -- -- -- -- --
50: 50 51 52 53 -- -- -- -- 58 59 5a 5b -- -- -- --
60: -- -- -- -- -- -- -- -- -- -- -- -- -- -- -- --
70: -- -- -- -- -- -- -- --
Unplug the connector and verify that no chip addresses are accessible any longer (otherwise you got the wrong i2c device). Re-plug the connector to continue.
We now dump the metadata stored in the EEPROM, which is accessible via chip address 0x50. While this can be done with the standard i2cdump command, we use i2csfp for all following steps for simplicity:
1
i2csfp /dev/i2c-2 i2cdump 0x50
     0  1  2  3  4  5  6  7  8  9  a  b  c  d  e  f   0123456789abcdef
00: 03 04 21 00 00 00 00 00 04 00 00 00 67 00 00 00   ..!.........g...
10: 00 00 01 00 4f 45 4d 20 20 20 20 20 20 20 20 20   ....OEM
20: 20 20 20 20 00 00 40 20 53 46 50 2d 48 31 30 47       ..@ SFP-H10G
30: 42 2d 43 55 31 4d 20 20 52 20 20 20 01 00 00 f3   B-CU1M  R   ....
40: 00 00 00 00 43 53 43 32 34 30 38 30 39 33 37 30   ....CSC240809370
50: 31 30 30 20 32 34 30 38 31 37 20 20 00 00 00 d1   100 240817  ....
60: 80 00 11 cc 53 1f 4f a8 1d e2 21 35 7d 1f 59 5d   ....S.O...!5}.Y]
70: 73 62 b3 00 00 00 00 00 00 00 00 00 26 ae 90 a5   sb..........&...
80: 43 4f 50 51 41 41 34 4a 41 42 33 37 2d 30 39 36   COPQAA4JAB37-096
90: 30 2d 30 33 56 30 33 20 01 00 46 00 00 00 00 cc   0-03V03 ..F.....
a0: 00 00 00 00 00 00 00 00 00 00 00 00 00 00 00 00   ................
b0: 00 00 00 00 00 00 00 00 00 00 00 00 00 00 00 00   ................
c0: 53 46 50 2d 48 31 30 47 42 2d 43 55 31 4d 20 20   SFP-H10GB-CU1M
d0: 20 20 20 20 30 39 00 00 00 00 00 00 00 00 00 b4       09..........
e0: 00 00 00 00 00 00 00 00 00 00 00 00 00 00 00 00   ................
f0: 00 00 00 00 00 00 00 00 00 00 00 00 00 00 00 00   ................
With a little bit of squinting, you can already see a vendor ID of “OEM”, a product ID of “SFP-H10GB-CU1M”, a serial number of “CSC240809370100” and a (likely wrong) manufacturing date of “240817”.
i2csfp makes it easy to modify vendor and product ID, as well as the “Extended Specification Compliance Code”, especially because changing these fields requires updating several checksums, otherwise the connector will not be properly recognized. In fact, it looks like i2csfp was created to work around a Linux SFP quirk that prevented a 2.5G transceiver to work correctly; in a sense it’s a quirk-quirk…
Now, let’s get a more readable representation of the metadata via ethtool, which allows reading (but not writing the metadata) via the network stack (this could indicate that adding write support might be possible in the future).
Here we use the network device name corresponding to the SFP2 port, which on BPI-R3 is sfp2:
1
ethtool -m sfp2
	Identifier                                : 0x03 (SFP)
	Extended identifier                       : 0x04 (GBIC/SFP defined by 2-wire interface ID)
	Connector                                 : 0x21 (Copper pigtail)
	Transceiver codes                         : 0x00 0x00 0x00 0x00 0x00 0x04 0x00 0x00 0x00
	Transceiver type                          : Passive Cable
	Encoding                                  : 0x00 (unspecified)
	BR Nominal                                : 10300MBd
	Rate identifier                           : 0x00 (unspecified)
	Length (SMF)                              : 0km
	Length (OM2)                              : 0m
	Length (OM1)                              : 0m
	Length (Copper or Active cable)           : 1m
	Length (OM3)                              : 0m
	Passive Cu cmplnce.                       : 0x01 (SFF-8431 appendix E [SFF-8472 rev10.4 only])
	Vendor name                               : OEM
	Vendor OUI                                : 00:40:20
	Vendor PN                                 : SFP-H10GB-CU1M
	Vendor rev                                : R
	Option values                             : 0x00 0x00
	BR margin max                             : 0%
	BR margin min                             : 0%
	Vendor SN                                 : CSC240809370100
	Date code                                 : 240817
Now we see in detail what we could guess from the product name “SFP-H10GB-CU1M”: It’s a 1 meter long (Length (Copper Or Active Cable)) DAC cable (Connector), and it is rated for 10 Gigabit/s (BR Nominal; 10300 Megabaud = 10.3 Gigabaud, i.e., bits/second)
That got me thinking: what happens if we modify the reported bandwidth rating?
SFF-8472, the EEPROM management interface specification for SFP connectors, states that the “nominal signaling rate” is specified at bytes 12 (0x0c) and/or 66 (0x42). For speeds under 25 Gbps, the bitrate is specified in byte 12 in units of 100 Mbaud, whereas for 25 Gbps speeds or higher, the value is 255 (0xFF), and the speed is stored in byte 66 (0x42) in units of 250 Mbaud.
Checking real hardware this means a value of 0x67 in byte 0x0c for 10G cables and a value of 0xff in byte 0x0c and a value of 0x68 in byte 0x42 for 25G cables. So let’s pretend our 10G cable is capable of 25G:
1
2
i2csfp /dev/i2c-2 byte write 0x50 0x0c 0xff
i2csfp /dev/i2c-2 byte write 0x50 0x42 0x68
(with the current version of i2csfp some extra wait time seems to be necessary between the calls, so either paste them one after the other into the terminal, or add sleep 1 after each invocation of i2csfp).
We now have to adjust the checksums in the EEPROM:
1
i2csfp /dev/i2c-2 eepromfix
Checksum 0x00-0x3e failed, set at f3, but should be 8b
Checksum 0x40-0x5e failed, set at d1, but should be 39
Error: i2c_transfer() failed: No such device or address
RollBall Password used: 0xfaffffff
Error: i2c_transfer() failed: No such device or address
Error: Cannot fill in password!
The command fails to update the checksum because some other operation aborts before writing (related to unlocking transceivers with a password — yes, that’s a thing!). Since we now know the correct checksums, we write them manually to the correct addresses (0x3f and 0x5f respectively):
1
2
3
i2csfp /dev/i2c-2 byte write 0x50 0x3f 0x8b
i2csfp /dev/i2c-2 byte write 0x50 0x5f 0x39
i2csfp /dev/i2c-2 eepromfix
Checksum 0x00-0x3e matched 8b
Checksum 0x40-0x5e matched 39
Error: i2c_transfer() failed: No such device or address
RollBall Password used: 0xfaffffff
Error: i2c_transfer() failed: No such device or address
Error: Cannot fill in password!
Just to be sure, let’s dump the new EEPROM contents:
1
i2csfp /dev/i2c-2 i2cdump 0x50
     0  1  2  3  4  5  6  7  8  9  a  b  c  d  e  f   0123456789abcdef
00: 03 04 21 00 00 00 00 00 04 00 00 00 ff 00 00 00   ..!.............
10: 00 00 01 00 4f 45 4d 20 20 20 20 20 20 20 20 20   ....OEM
20: 20 20 20 20 00 00 40 20 53 46 50 2d 48 31 30 47       ..@ SFP-H10G
30: 42 2d 43 55 31 4d 20 20 52 20 20 20 01 00 00 8b   B-CU1M  R   ....
40: 00 00 68 00 43 53 43 32 34 30 38 30 39 33 37 30   ..h.CSC240809370
50: 31 30 30 20 32 34 30 38 31 37 20 20 00 00 00 39   100 240817  ...9
60: 80 00 11 cc 53 1f 4f a8 1d e2 21 35 7d 1f 59 5d   ....S.O...!5}.Y]
70: 73 62 b3 00 00 00 00 00 00 00 00 00 26 ae 90 a5   sb..........&...
80: 43 4f 50 51 41 41 34 4a 41 42 33 37 2d 30 39 36   COPQAA4JAB37-096
90: 30 2d 30 33 56 30 33 20 01 00 46 00 00 00 00 cc   0-03V03 ..F.....
a0: 00 00 00 00 00 00 00 00 00 00 00 00 00 00 00 00   ................
b0: 00 00 00 00 00 00 00 00 00 00 00 00 00 00 00 00   ................
c0: 53 46 50 2d 48 31 30 47 42 2d 43 55 31 4d 20 20   SFP-H10GB-CU1M
d0: 20 20 20 20 30 39 00 00 00 00 00 00 00 00 00 b4       09..........
e0: 00 00 00 00 00 00 00 00 00 00 00 00 00 00 00 00   ................
f0: 00 00 00 00 00 00 00 00 00 00 00 00 00 00 00 00   ................
Checking with ethtool, we now see that the new speed is reported correctly:
1
 ethtool -m sfp2
	Identifier                                : 0x03 (SFP)
	Extended identifier                       : 0x04 (GBIC/SFP defined by 2-wire interface ID)
	Connector                                 : 0x21 (Copper pigtail)
	Transceiver codes                         : 0x00 0x00 0x00 0x00 0x00 0x04 0x00 0x00 0x00
	Transceiver type                          : Passive Cable
	Encoding                                  : 0x00 (unspecified)
	BR Nominal                                : 26000MBd
	Rate identifier                           : 0x00 (unspecified)
	Length (SMF)                              : 0km
	Length (OM2)                              : 0m
	Length (OM1)                              : 0m
	Length (Copper or Active cable)           : 1m
	Length (OM3)                              : 0m
	Passive Cu cmplnce.                       : 0x01 (SFF-8431 appendix E [SFF-8472 rev10.4 only])
	Vendor name                               : OEM
	Vendor OUI                                : 00:40:20
	Vendor PN                                 : SFP-H10GB-CU1M
	Vendor rev                                : R
	Option values                             : 0x00 0x00
	BR margin max                             : 0%
	BR margin min                             : 0%
	Vendor SN                                 : CSC240809370100
	Date code                                 : 240817
We repeat the above steps for the other end of the cable. Note that, for my cables, all bytes, including serial numbers, were identical on both ends.
We now plug the freshly “uprated” DAC cable into the SFP ports of two computers, and re-run iperf3:
1
2
3
4
5
# run iperf3 server on machine 192.0.2.1
iperf3 -s

# run iperf3 client on machine 192.0.2.2 and connect back to 192.0.2.1
iperf3 -i 1 -c 192.0.2.1 --bidir
Connecting to host 192.0.2.1, port 5201
[  5] local 192.0.2.2 port 42388 connected to 192.0.2.1 port 5201
[  7] local 192.0.2.2 port 42392 connected to 192.0.2.1 port 5201
[ ID][Role] Interval           Transfer     Bitrate         Retr  Cwnd
[  5][TX-C]   0.00-1.00   sec  2.63 GBytes  22.6 Gbits/sec    0   1.79 MBytes
[  7][RX-C]   0.00-1.00   sec  2.51 GBytes  21.5 Gbits/sec
[  5][TX-C]   1.00-2.00   sec  2.71 GBytes  23.3 Gbits/sec  108   3.41 MBytes
[  7][RX-C]   1.00-2.00   sec  2.69 GBytes  23.1 Gbits/sec
[  5][TX-C]   2.00-3.00   sec  2.72 GBytes  23.4 Gbits/sec    0   3.95 MBytes
[  7][RX-C]   2.00-3.00   sec  2.68 GBytes  23.1 Gbits/sec
[  5][TX-C]   3.00-4.00   sec  2.74 GBytes  23.5 Gbits/sec    0   4.00 MBytes
[  7][RX-C]   3.00-4.00   sec  2.69 GBytes  23.1 Gbits/sec
[  5][TX-C]   4.00-5.00   sec  2.14 GBytes  18.4 Gbits/sec  499   4.06 MBytes
[  7][RX-C]   4.00-5.00   sec  2.69 GBytes  23.1 Gbits/sec
[  5][TX-C]   5.00-6.00   sec  2.73 GBytes  23.5 Gbits/sec    0   4.06 MBytes
[  7][RX-C]   5.00-6.00   sec  2.70 GBytes  23.2 Gbits/sec
[  5][TX-C]   6.00-7.00   sec  2.74 GBytes  23.5 Gbits/sec    0   4.06 MBytes
[  7][RX-C]   6.00-7.00   sec  2.71 GBytes  23.2 Gbits/sec
[  5][TX-C]   7.00-8.00   sec  2.73 GBytes  23.4 Gbits/sec    0   4.06 MBytes
[  7][RX-C]   7.00-8.00   sec  2.71 GBytes  23.2 Gbits/sec
[  5][TX-C]   8.00-9.00   sec  2.72 GBytes  23.4 Gbits/sec    0   4.06 MBytes
[  7][RX-C]   8.00-9.00   sec  2.71 GBytes  23.3 Gbits/sec
[  5][TX-C]   9.00-10.00  sec  2.73 GBytes  23.4 Gbits/sec    0   4.06 MBytes
[  7][RX-C]   9.00-10.00  sec  2.72 GBytes  23.4 Gbits/sec
- - - - - - - - - - - - - - - - - - - - - - - - -
[ ID][Role] Interval           Transfer     Bitrate         Retr
[  5][TX-C]   0.00-10.00  sec  26.6 GBytes  22.8 Gbits/sec  607            sender
[  5][TX-C]   0.00-10.00  sec  26.6 GBytes  22.8 Gbits/sec                  receiver
[  7][RX-C]   0.00-10.00  sec  26.8 GBytes  23.0 Gbits/sec   12            sender
[  7][RX-C]   0.00-10.00  sec  26.8 GBytes  23.0 Gbits/sec                  receiver

iperf Done.
As a final step — if the cable passes the check — I suggest marking it with blue tape on both ends, to indicate the modification and to make it slightly resemble the original 25 GbE DAC.
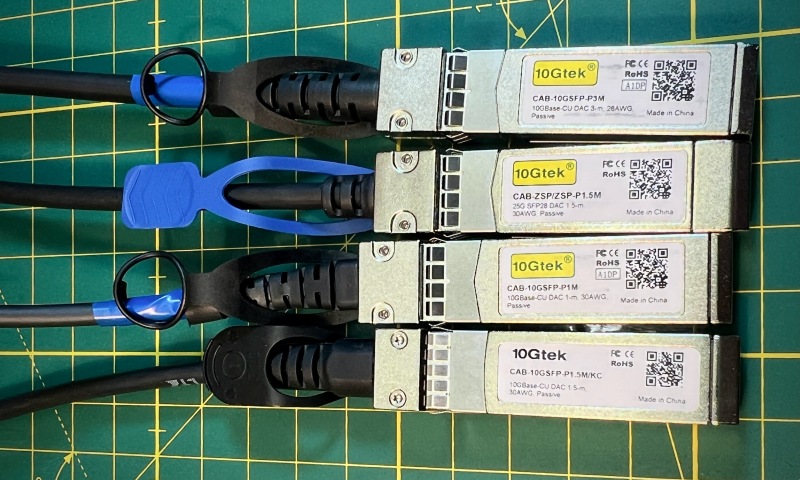
I’ve tried this EEPROM mod with several 10 Gbps DAC cables I had lying around. They’re all from 10Gtek, but I guess my findings apply to other brands as well: Interestingly, one of the cables just wouldn’t work at 25 Gbps after the modification — according to ethtool the link was down.
Checking for differences, I noticed the non-upgradable DAC had a 10Gtek logo without a yellow background, and it had screws instead of rivets. Remarkably, it also has the thinnest cable, so maybe it’s really an issue of resistance/shielding. Whenever you can, prefer 26AWG cables over 30AWG ones (26AWG is significantly thicker than 30AWG), but that alone doesn’t seem to be the problem.
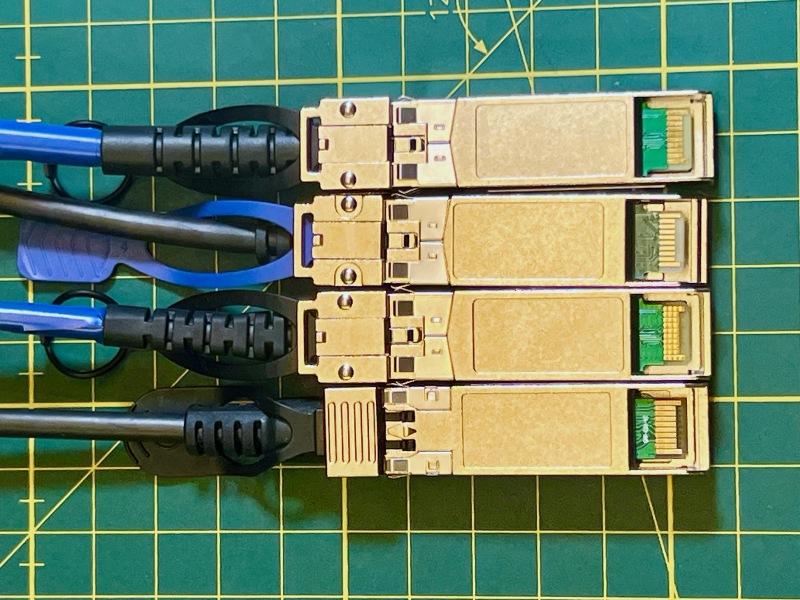
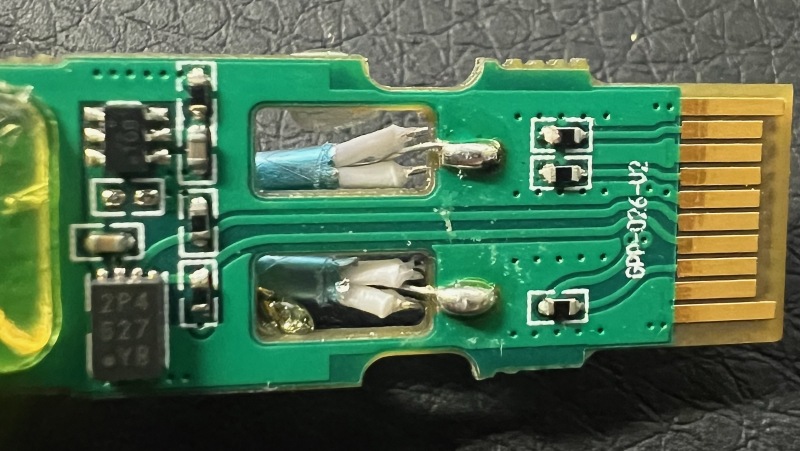
By looking at the back of the connector, where you can see a part of the PCB, we can also rule out that 10Gtek just remarkets “downrated” 25 GbE cables — the PCBs look all different, yet there seems to be a commonality between the connectors with a yellow Gtek logo and rivets:
So while we’re at it, let’s take a look inside the non-upgradable cable (I also tried peeking inside a riveted one, but I don’t currently have the tools to open it).
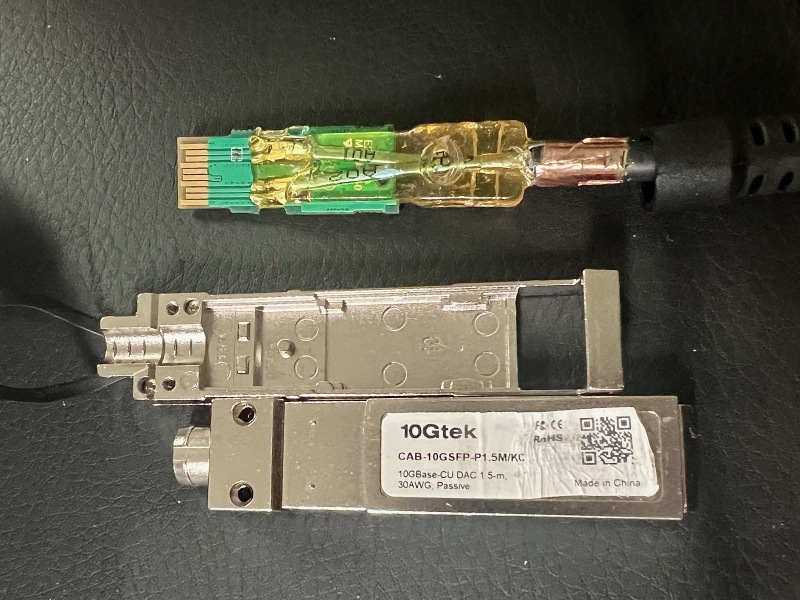
For better inspection, I removed the hard yellow resin encapsulating most of the PCB.
As you can see, the wires of the Twinax cables are super-tiny, a fraction of the pin width. If you ever need to resolder these, keep in mind that they are crossed, i.e., the top-most wire connects to the bottom-most wire on the other end, and so on.
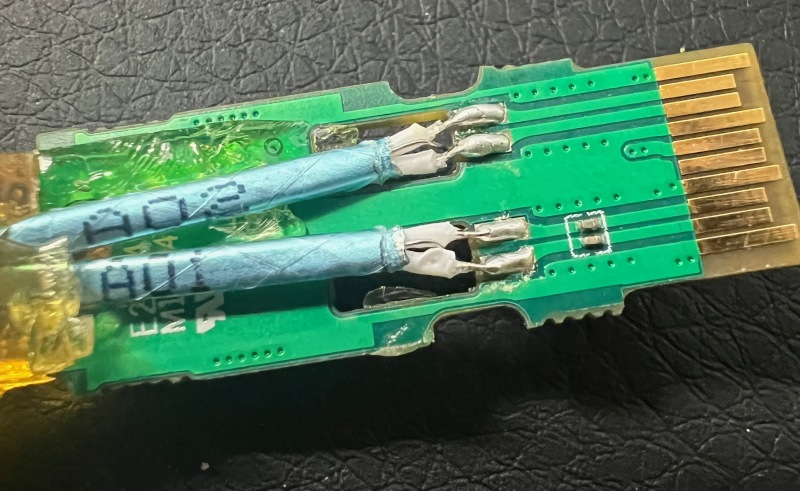
The Twinax ground is connected from the bottom, and both grounds are connected on both ends. The bottom also holds the EEPROM and some other minor components.
For fun, I tried replacing the Twinax cables with a Cat.8 cable I had lying around. However, without the resin in place, I kept ripping off the pads, so I gave up on it. If anyone is keen to continue where I left off, please keep me posted!
In summary, you have a good chance that your existing 10GbE DAC gear can be uprated to 25GbE by poking around in the EEPROM data over I2C. If nothing else, now you know what little is inside that passive SFP DAC cable, which — unlike your other SFP gear — doesn’t get hot to the touch.
Update (April 2026)
It turns out that you may need to change another value in the EEPROM:
1
2
# changes the "extended" transceiver info value from 0x00 to 0x0d
i2csfp /dev/i2c-2 byte write 0x50 0x24 0x0d
This marks the transceiver as “25G Base-CR CA-N”, which actually makes the last 10Gtek cable also work with 25G speeds.
That change is also necessary when using Chelsio network cards, otherwise the cables will run at 10G speeds. I assume the Mellanox hardware is just more tolerant towards cheap cables.
The Chelsio setup may also fail to reach 25G speeds bidirectionally with certain cables, even degrading significantly below 5Gbit/s in one direction, so keeping the value set to 0x00 may be the right call (that way, you may or may not get 25G speeds, but not lower than 10G).
Meanwhile, I also tried cables from several other manufacturers (models including ZX-10GSFP-P1M, ATS SFP-H10G-CU1M, SFP-10G-CU1M), and they all work for me at 25G speeds.
Except for some old Mellanox (duh!) cables from 2014, P/N MCP2100/MCP2104. I couldn’t flash them at all (the case was riveted, so I couldn’t even try flashing manually). These cables would only report I2C address 0x50, so maybe that’s an easy way to spot them.
Lastly, I’ve put together a small script, dactylus, that automates the process (it works for me; use at your own risk).