I stumbled upon this tiny Thunderbolt to 25 Gigabit Ethernet adapter on Amazon. It’s powered from the host, meaning there is only one cable, no additional power supply required. This is great for mobile setups and desktop work alike.
The device comes in a nice travel pouch along with a rather short Thunderbolt cable. It is plug-and-play on macOS.
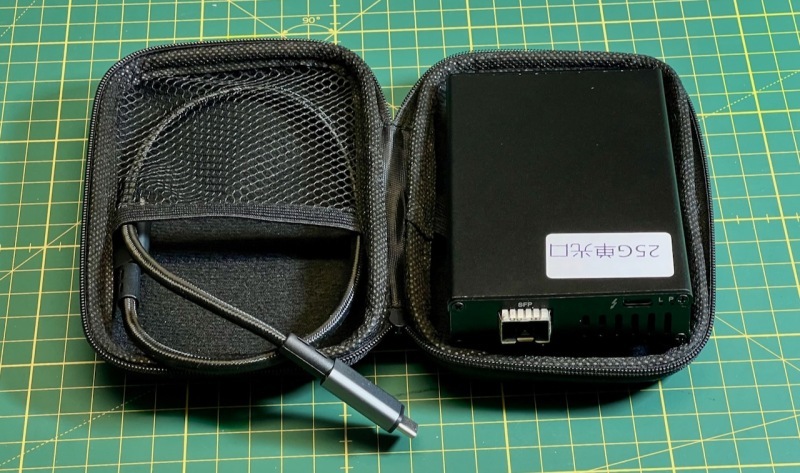
You can find the device under many names on Amazon (search for “thunderbolt 25G”). It comes in two flavors, single port and dual port SFP28, currently starting from $157. Most of its Amazon product pages don’t have reviews, and if they do, they’re mostly negative. I initially bought the dual port version at a good price, and later also obtained the single port version used in an even better deal.
There’s no manual or manufacturer information; I assume it was put together by a small company in China (I found a corresponding offering on 1688, a Chinese b2b platform; also on Taobao). On my MacBook Pro, the device identifies as “PX Thunderbolt to Ethernet”.
All other 25 GbE adapter solutions I’ve found so far require an additional power supply, and either lack a proper case (like those cool Thunderbolt GPU dock setups) or have a spinning fan. I didn’t at all look at the ATTO ThunderLink or Sonnet Twin25G due to their obscene prices.
With the obvious advantages of being absolutely quiet and not requiring an additional power supply, the biggest downside of the PX adapter is that it gets really hot, like not touchable hot.
Sometimes, either the network connection silently disappeared or (sadly) my Mac crashed with a kernel panic in the network driver. Apple has assured me that this was not a security issue.
Other than that, the PX seems to do the job: iperf3 reports a bitrate of 20.7 Gbits/sec (in one direction) and 8.4 + 17 = 25.4 Gbits/sec (saturated bidirectionally), approaching the practical limit for PCIe devices over Thunderbolt 3 or 4, which is in line with all other 25 Gigabit Ethernet/Thunderbolt adapters I’ve tested.
For comparison, connecting two 25 GbE PCIe network cards (i.e., without Thunderbolt involved, between two Linux machines), I got 23.5 Gbits in both directions each, so that would be just 12% better when transferring in one direction. It is significantly better (+85%) when saturating both directions, however that is not a concern for my needs.
What I didn’t test was the throughput of two simultaneous connections. It’s rather pointless: we’re already maxing out the bandwidth alloted by Thunderbolt with a single SFP28 converter. Realistically, the dual-SFP28 version is only useful for high-availability scenarios and for connecting the computer to two different networks.
Even with these good performance numbers, due to the heat issue it seems the device has no reliable use case except maybe for a quick data transfer (hence the travel bag?). Speaking of case: some reviewer on Amazon mentioned that removing the housing would fix the issue, but then you’re left with an unprotected contraption not very much unlike the GPU thunderbolt PCIe docks…
So what can we do? Well, obviously, take it apart to see how it works, and devise a fix. Unscrew these four screws in the front (where the connectors are), and the innards can be pulled out of its chassis.

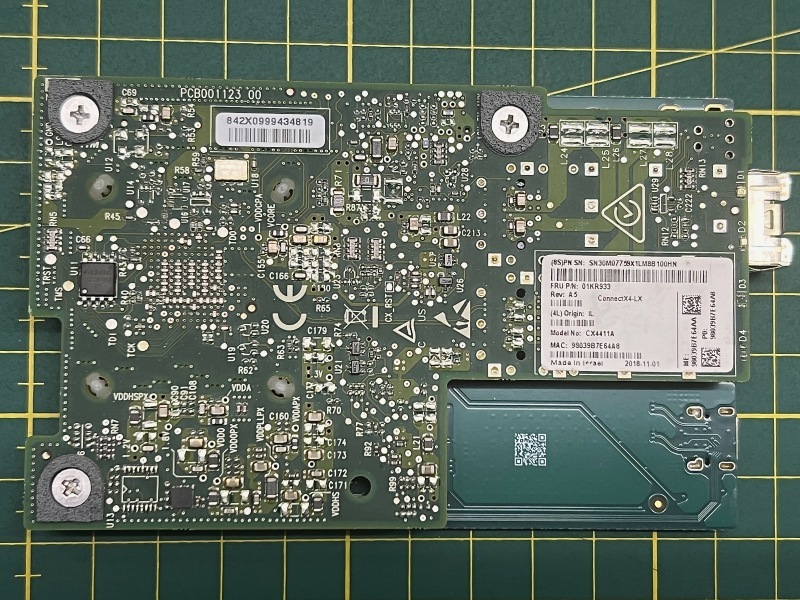
To my surprise, there are two PCBs sandwiched together. The PX actually consists of a Mellanox ConnectX-4 Lx EN OCP 2.0 form factor card (either MCX4411A single port or MCX4421A dual port), and an OCP 2.0 to Thunderbolt 3 adapter card (labeled “Thunderbolt3 To 25/10G Internet” and “tb3_ocp2” on the other side’s QR code). I couldn’t find this part elsewhere separately.
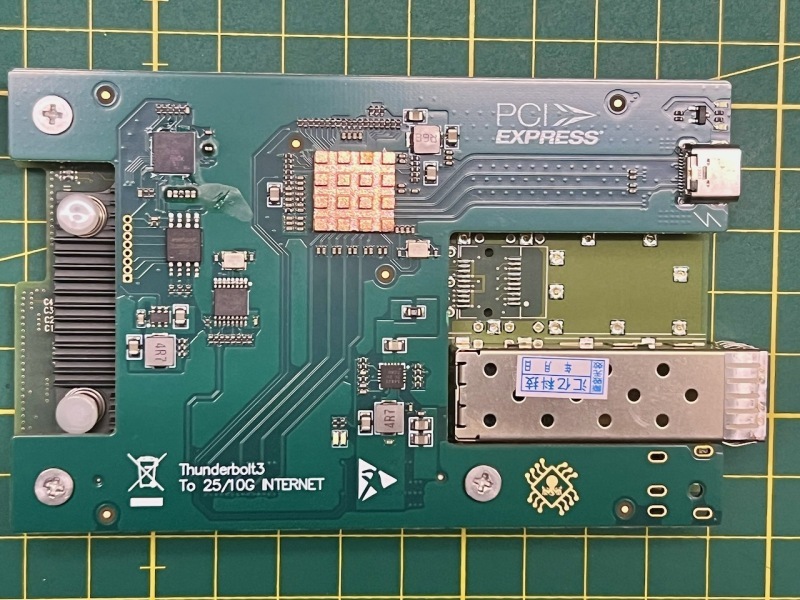
Of note, the copper heatsink in the picture above was missing from the PCB of the dual-port variant I got, so adding it where it’s missing may be a good idea.
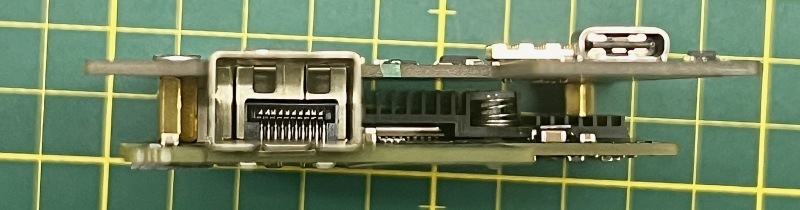
Note the rather unfortunate placement of the network card’s tiny heatsink between the two PCBs.
Mellanox ConnectX-4 OCP 2.0 cards can be had for cheap (~ $20) online; they are old data center gear. Inexpensive OCP 2.0 to PCIe adapters exist, and so the cards are repurposed in various ways. What you pay extra for the PX adapter essentially is the ingenuity of the Thunderbolt adapter PCB, the aluminium enclosure and the travel case.
Mellanox, which is now owned by Nvidia, produces high quality networking equipment. The cards are legit server gear, supporting RDMA over Ethernet, SR-IOV, and many other shenanigans. At least if you got the drivers, like on Linux. On macOS, they’re simply plug-and-play (via the “mlx5” DriverKit driver), but you cannot configure much.
The cards are rated for ambient temperatures of up to 55 °C and chip temperatures of up to 105 °C. Without proper cooling the case will get too hot to touch (and then fail)!
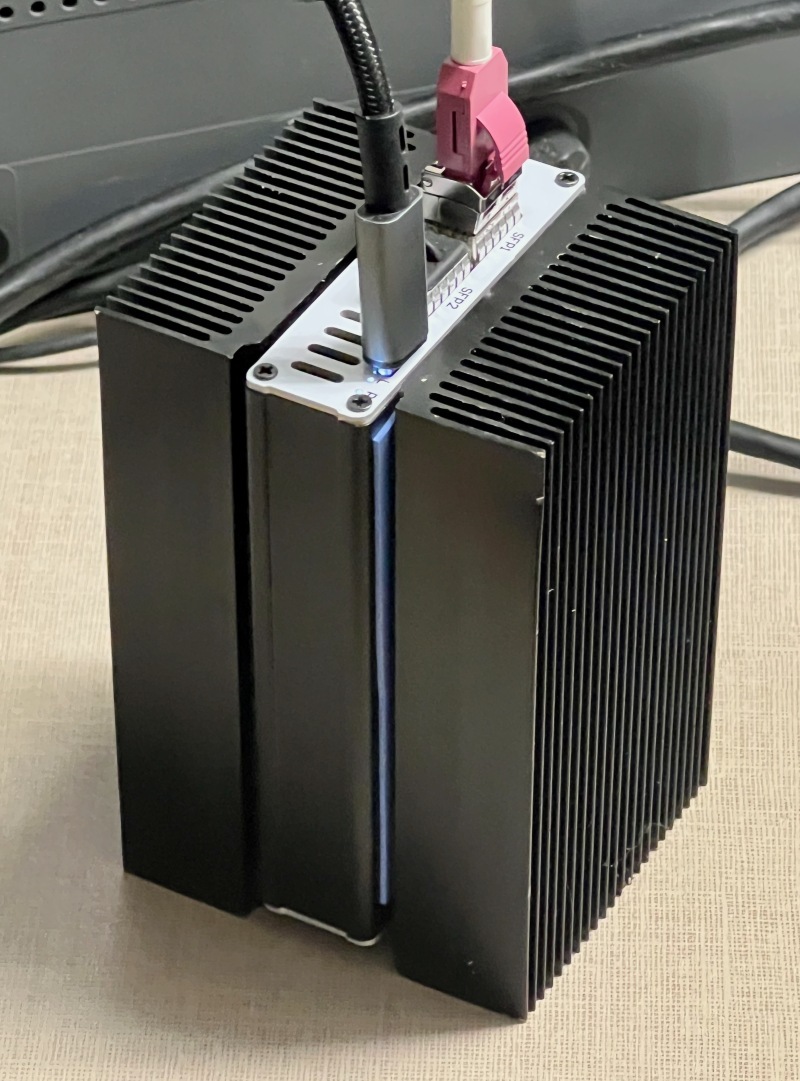
Usually a small breeze coming from a fan is enough to keep the temperatures in check. However, I was looking for a fanless solution, so I came up with this:
Two big-ass heat sinks (4.72” x 2.72” x 1.06”), which I got for $17, stuck on with 6.0W/mK 1mm thermal pad, cut to size ($5). The heatsinks are just a little longer than the case, allowing for some air exchange when put upright.

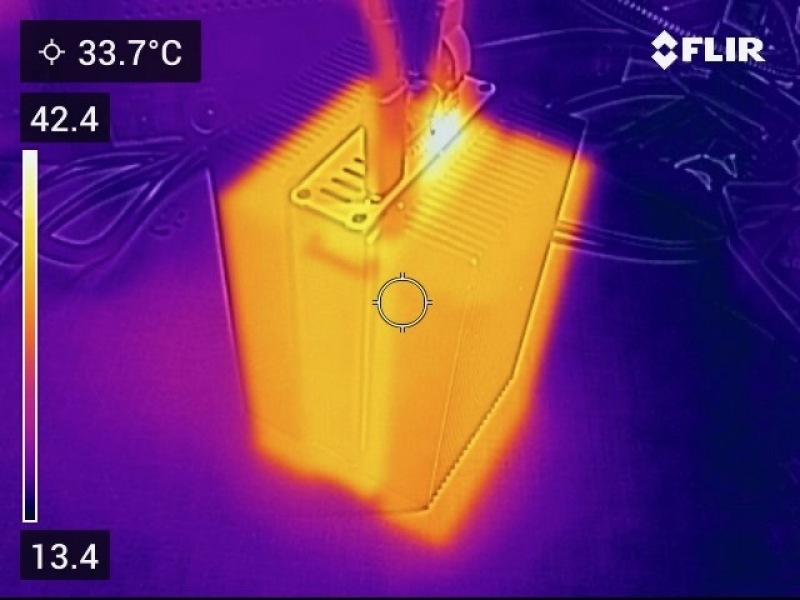
This makeshift cooling solution — requiring no disassembly — reduces temperatures by at least 15 Kelvin, bringing the ambient enclosure temperature below 40 °C, and core temperatures to around 75 °C, as measured by infrared camera. And more importantly, it prevents a catastrophic meltdown of precious networking equipment…
One last thing I did to increase stability was to update the Mellanox firmware.
This however turns out to be impossible from macOS, so I resorted to using my Lenovo ThinkStation P330 Tiny, which came with a Thunderbolt 3 card. You can try any other PC with Thunderbolt 3/4 or USB 4, and it should probably work, too.
First, after connecting the PX adapter to my Linux machine, I made sure that Thunderbolt support was enabled in the BIOS and the Thunderbolt card was connected using the correct riser card for my Lenovo Tiny. I then booted into my trusty Alpine Linux and made the following incantations to get started.
1
2
3
4
5
6
7
8
9
# Become root
sudo su

# Install dependencies
apk add mstflint bolt dbus polkit pciutils
/etc/init.d/dbus start

# Check for connected Thunderbolt devices
boltctl
The output of boltctl looked like this:
1
2
3
4
5
6
7
8
9
10
11
12
13
 ● PX Thunderbolt To Ethernet
   ├─ type:          peripheral
   ├─ name:          Thunderbolt To Ethernet
   ├─ vendor:        PX
   ├─ uuid:          00303029-bce3-8680-ffff-ffffffffffff
   ├─ generation:    Thunderbolt 3
   ├─ status:        connected
   │  ├─ domain:     d0010000-0080-7f18-23df-600658f3f11e
   │  ├─ rx speed:   20 Gb/s = 2 lanes * 10 Gb/s
   │  ├─ tx speed:   20 Gb/s = 2 lanes * 10 Gb/s
   │  └─ authflags:  none
   ├─ connected:     Sat Jan 24 22:37:00 2026
   └─ stored:        no
Now we need to invite our PX Thunderbolt device to the party (taking the value from uuid, yours may be different):
1
boltctl enroll 00303029-bce3-8680-ffff-ffffffffffff
which should yield the following response:
1
2
3
4
5
6
7
8
9
10
11
12
13
14
15
16
17
18
19
 ● PX Thunderbolt To Ethernet
   ├─ type:          peripheral
   ├─ name:          Thunderbolt To Ethernet
   ├─ vendor:        PX
   ├─ uuid:          00303029-bce3-8680-ffff-ffffffffffff
   ├─ dbus path:     /org/freedesktop/bolt/devices/00303029_bce3_8680_ffff_ffffffffffff
   ├─ generation:    Thunderbolt 3
   ├─ status:        authorized
   │  ├─ domain:     d0010000-0080-7f18-23df-600658f3f11e
   │  ├─ parent:     d0010000-0080-7f18-23df-600658f3f11e
   │  ├─ syspath:    /sys/devices/pci0000:00/0000:00:1d.0/0000:02:00.0/0000:03:00.0/0000:04:00.0/domain0/0-0/0-1
   │  ├─ rx speed:   20 Gb/s = 2 lanes * 10 Gb/s
   │  ├─ tx speed:   20 Gb/s = 2 lanes * 10 Gb/s
   │  └─ authflags:  none
   ├─ authorized:    Sat Jan 24 22:37:36 2026
   ├─ connected:     Sat Jan 24 22:37:00 2026
   └─ stored:        Sat Jan 24 22:37:36 2026
      ├─ policy:     auto
      └─ key:        no
This tells us that the device is properly authorized, registered as a PCIe device, and all. For whatever reason, however, we also need to rescan the PCIe bus:
1
echo 1 > /sys/bus/pci/rescan
We can now find the Mellanox ethernet controller via lspci -v:
1
2
3
4
5
6
7
8
9
10
11
12
13
14
15
16
17
...
07:00.0 Ethernet controller: Mellanox Technologies MT27710 Family [ConnectX-4 Lx]
	Subsystem: Mellanox Technologies MCX4411A-ACQN, ConnectX-4 Lx EN OCP, 1x25Gb
	Flags: bus master, fast devsel, latency 0, IRQ 18
	Memory at 50000000 (64-bit, prefetchable) [size=32M]
	Expansion ROM at 9c000000 [virtual] [disabled] [size=1M]
	Capabilities: [60] Express Endpoint, IntMsgNum 0
	Capabilities: [48] Vital Product Data
	Capabilities: [9c] MSI-X: Enable+ Count=64 Masked-
	Capabilities: [c0] Vendor Specific Information: Len=18 <?>
	Capabilities: [40] Power Management version 3
	Capabilities: [100] Advanced Error Reporting
	Capabilities: [150] Alternative Routing-ID Interpretation (ARI)
	Capabilities: [180] Single Root I/O Virtualization (SR-IOV)
	Capabilities: [1c0] Secondary PCI Express
	Kernel driver in use: mlx5_core
...
07:00.0 is the PCI bus address for the device, which we’ll need to tell to the Mellanox driver tool in a moment, but now we download the latest firmware from NVIDIA’s ConnectX-4 downloads page. Select the right “OPN” from the list; see the value reported by lspci under “subsystem”, e.g., MCX4411A-ACQ(N), then select the value shown for PSID (if more than one option is given check mstflint -d 07:00.0 query full for the correct PSID), and finally click the download link to download the zip archive. Copy it to the Linux server and unzip it.
Flashing the firmware is then as easy as this:
1
mstflint -d 07:00.0 -i ./fw-ConnectX4Lx-rel-14_32_1908-MCX4411A-ACQ_Ax-UEFI-14.25.17-FlexBoot-3.6.502.bin burn
That may take a while, and you should definitely not interrupt the process. Eventually you will see this confirmation:
1
2
3
4
5
6
7
Done.
    Current FW version on flash:  14.20.1010
    New FW version:               14.32.1908

Burning FW image without signatures - OK
Restoring signature                     - OK
-I- To load new FW run mstfwreset or reboot machine.
Your PX adapter is now ready to use.
This setup has been rock-solid for me for the past couple of months. I hope it works for you, too.
A few more remarks:
- You may want to get a longer cable, any “USB4 40GBps” (or Thunderbolt 3/4) should do.
- Connect the PX adapter directly to your Mac. Thunderbolt docks may work but then you share the bandwidth with other devices on the bus.
- If you’re are looking for an all-in-one Ethernet Thunderbolt + Monitor charging dock, and are comfortable with some occasional, minor background fan noise, then consider the Raiden Digit Light One. You can even update its adapter firmware using the same instructions as above, as it uses the very same ConnectX-4 OCP 2.0 setup.
- Updating the firmware on these cards really requires a Linux/Windows machine, as even Asahi Linux on the MacBook Pro M1 does not support Thunderbolt yet.
- Sadly, with the heatsinks, the adapter no longer fits in the travel case.